Step 4: Cake Decorating Practice

On this page you will find all the versatile cake decorating techniques you're going to learn. These techniques are from an old Wilton Cake decorating booklet from 1971. See this book
They say, "All you need to start is the back of a cookie sheet, the decorating bag fitted with the tube required, and your decorating icing in the correct consistency specified. All you have to add, is lots of patience and practice."
Tip: Scrape your practice decorations off cookie sheet and use the icing again while practicing.
Okay, Let's Get Started:
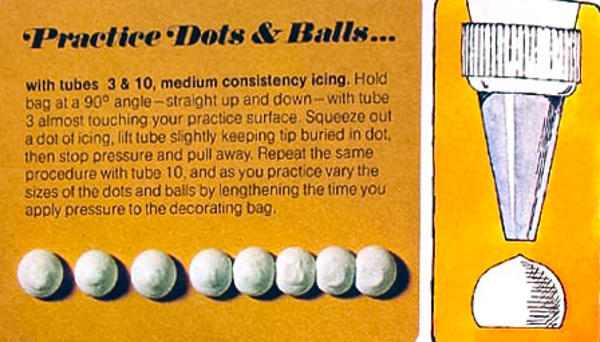
Practice Dots and Balls...
With tubes 3 and 10, medium consistency icing. Hold bag at a 90° angle-straight up and down-with tube 3 almost touching your practice surface.
Squeeze out a dot of icing, lift tube slightly keeping tip buried in dot, then stop pressure and pull away.
Repeat the same procedure with tube 10, and as you practice vary the sizes of the dots and balls by lengthening the time you apply pressure to the decorating bag.
See picture below.
Practice Making Stars
With tubes 16, 21, and 199, medium consistency icing.
Hold bag at a 90° angle-straight up and down-with the tube almost touching your practice surface.
Squeeze out a star of icing, lift tube slightly keeping tip in icing; then stp pressure and pulll tube away.
As you practice stars with different tube sizes, you'll see what attractive borders they can make. When arranged close together, stars can cover the entire top of a cake.
See picture below.

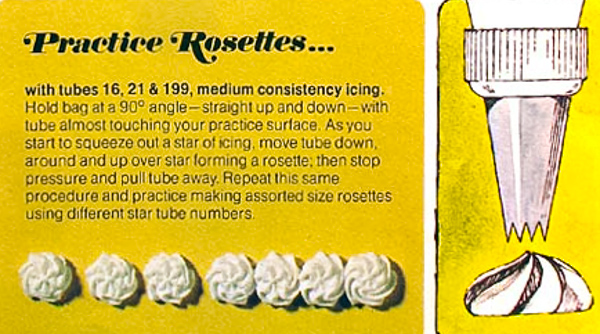
Practice Making Rosettes
With tubes 16, 21, and 199, medium consistency icing.
Hold bag at a 90° angle-straight up and down-with the tube almost touching your practice surface.
As you start to squeeze out a star of icing, move tube down, around and up over star forming a rosette; then stop pressure and pull tube away.
Repeat this same procedure and practice making assorted size rosettes using different star tube numbers.
See the full page: dots and balls, stars, and rosettes
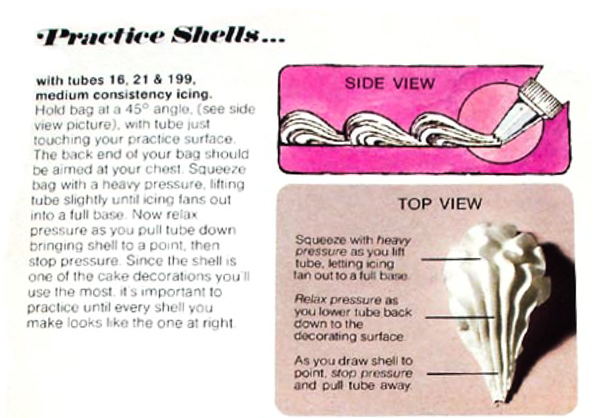
Practice Making Shells
With tubes 16, 21, and 199, medium consistency icing.
Hold bag at a 45° angle. (see side view picture), with tube just touching your practice surface. The back end of the bag should be aimed at your chest.
Squeeze bag with a heavy pressure, lifting tube slightly until icing fans out into a full base.
Now relax pressure as you pull tube down bringing shell to a point, then stop pressure.
Since the "shell" is one of the cake decorations you'll use the most, it is important to practice until every shell you make looks like the one below.
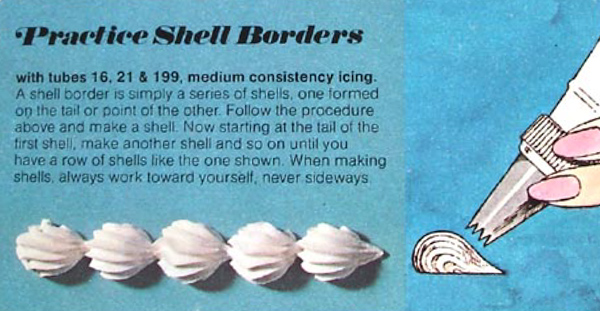
Practice Shell Borders
With tubes 16, 21, and 199, medium consistency icing.
A shell border is simply a series of shells, one formed on the tail or point of the other.
Follow the procedure above and make a shell. Now starting at the tail of the first shell, make another shell and so on until you have a row of shells like the one shown below.
When making shells, always work toward yourself, never sideways.
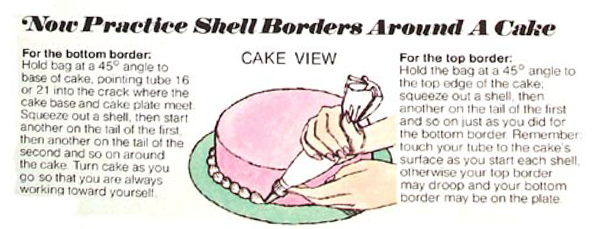
Practice Shell Borders around a Cake
For the bottom border:
Hold bag at a 45° angle to base of cake, pointing tube 16 or 21 into the crack where the cake base and cake plate meet.
Squeeze out a shell, then start another on the tail of the first then another on the tail of the first then another on the tail of the second and so on around the cake.
Turn cake as you go so that you are always working toward yourself.
For the top border:
Hold bag at a 45° angle to the top edge of the cake, squeeze out a shell, then another on the tail of the first and so on just as you did for the bottom border.
Remember to touch your tube to the cake's surface as you start each shell, otherwise your top border may droop and your bottom border may be on the plate.
See the full page: shells and shell borders
Border Variations
"Once you've mastered the technique of making a shell, you can apply the same procedure to many different border designs. All follow the basic pressure rhythm as the shell - a heavy to relaxed pressure - so let's get practicing."
Practice: Beads, Reverse Shells, and Fleur-De-Lis
Practice: Zigzag, Puffs, Garlands, and Ropes
Practice: Decorating Side of Cake - Scrolls
Printing and Writing
Anyone can learn how to print and write with icing regardless of penmanship, because writing on a cake is entirely different from writing on paper. You can use the movement of your entire arm, not just your fingers, to form individual letters. Of course like any decorating technique, you'll need to practice.
So get out your cookie sheet and icing that is thinned down enough to flow smoothly out of the tube. Use the tubes specified for each exercise and hold the decorating bag at a 45 degree angle to your practice surface, with the back of the bag to the right side so your fingertips face you. Remember as you practice, move your entire arm, bending it only at the elbow.
Practice: writing samples
Practice: making stripes and basketweave
Fun to make frills that fancy up party cakes, like ruffles, ribbons and bows are made with Wilton's tube 104 and medium consistency icing.
Practice making: Ruffles, Ribbons and Bows
One final note on this, is that you will develop your own style which will in turn make your decorations unique.
Continue to: Step 5: Color Makes the Cake
Cake Decorating Pages
- Cake Decorating Books Info
- Step 1: Decorating Tools You Need
- Step 2: Basic Tube Design Types
- Step 3: Using Your Decorator bag
- Step 4: Practice your Decorating
- Step 5: Color Makes the Cake
- Step 6: How to Make Drop Flowers
- Step 7: How to Make Leaves
- Decorate your First Wedding Cake
- Rolled Fondant and Buttercream Frosting
- Easy Homemade Cake Recipes
- Birthday Cake Decorating Ideas
- White Icings and Frostings
- Chocolate Icings and Frostings
- Cheese cakes
- Fruit Cakes
- Christmas Cakes
