Step 3: How to Use a Decorating Bag
Like all decorating tools, the correct procedure for preparing and filling the decorator bag is necessary to producing beautiful cake decorations. If the decorating bag is not clean, or too full, or held improperly, the icing will not flow smoothly out of the tube. So to contain your icing properly for the best decorating results, follow this step by step procedure starting with a clean bag.
A clean decorating bag is important, so always wash and rinse it thoroughly after every use, then dry it completely before filling.
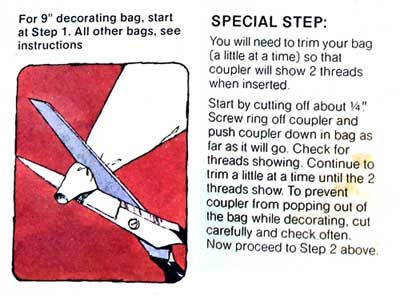
For 9" decorating bag, start at Step 1. All other bags, see instructions below.
Here's How to Get Your Bag Ready.
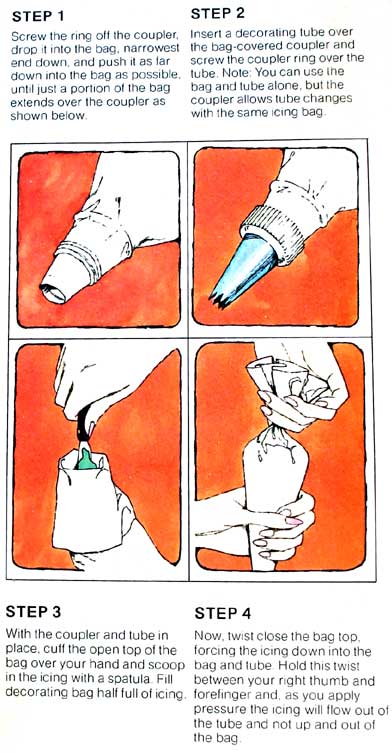
Step 1:
Screw the ring off the coupler, drop it into the bag, narrowest end down, and push it as far down into the bag as possible, until just a portion of the bag extends over the coupler as shown below.
Step 2:
Insert a decorating tube over the bag-covered coupler and screw the coupler ring over the tube.
Note: You can use the bag and tube alone, but the coupler allows tube changes with the same icing bag.
Step 3:
With the coupler and tube in place, cuff the open top of the bag over your hand and scoop in the icing with a spatula. Fill decorating bag half full of icing.
Step 4:
Now, twist close the bag top, forcing the icing down into the bag and tube. Hold this twist between your right thumb and forefinger and, as you apply pressure the icing will flow out of the tube and not up and out of the bag.
The Three Essentials of Decorating
Now that you're familiar with the tools you use to decorate, the elements of a cake, the six basic tube designs, the icing recipes and the procedure for preparing the decorating bag, you're ready to learn the three essentials of decorating that are necessary to the success of any technique you attempt.
1. ICING CONSISTENCY:
If the consistency of your decorator icing isn't just right, your decorations won't be right either. Flowers require a stiffer icing consistency, or the petals will droop; borders require a medium icing consistency or the uniform designs will disappear and writing requires a soft icing consistency or the stringwork won't flow smoothly out of the tube.
2. CORRECT POSITION:
The angle at which you hold your decorating bag and tube must be correct in order to produce a satisfactory decoration. For the decorating bag there are two basic positions: the 90° angle and the 45° angle. In the 90° angle, the decorating bag is held perpendicular to the decorating surface. In the 45° position, the decorating bag is held at a slant to the decorating surface.
3. PRESSURE CONTROL:
The amount of pressure and the steadiness with which it's applied to the decorating bag will determine the size and uniformity of any icing design. Some decorations require even pressure, other a varying application of light, medium or heavy pressure. In any instance, the more rhythmic and controlled the pressure, the more exact the decoration.
SPECIAL NOTE TO LEFTIES:
If you are left handed, hold the decorating bag in your left hand and guide the decorating tube with the fingers of your right hand. If the instructions say to hold decorating bag over to the right, you should hold your decorating bag over to the left.
A right handed person will always decorate from left to right. A left handed person should always decorate from right to left. The only exception to this rule is when you are writing or printing.
See the full page: Three Essentials of Decorating
Continue to: Step 4: Practicing your Decorating
Cake Decorating Tutorials
- Cake Decorating Books
- Step 1: Decorating Tools You Need
- Step 2: Basic Tube Design Types
- Step 3: Using Your Decorator bag
- Step 4: Practicing your Decorating
- Step 5: Color Makes the Cake
- Step 6: How to Make Drop Flowers
- Step 7: How to Make Leaves
- Rolled Fondant and Buttercream Frosting
- Make you First Wedding Cake
- Easy Homemade Cake Recipes
- Birthday Cake Decorating Ideas
- White Icings and Frostings
- Chocolate Icings and Frostings
- Cheese cakes, Fruit Cakes, Christmas Cakes